Sunday, August 28, 2011

A Coat of Paint

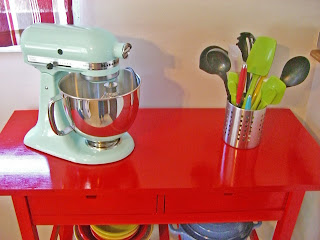
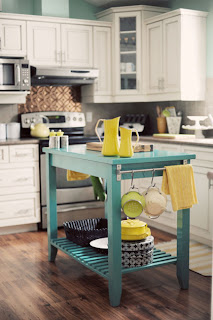
We've been working little by little on adding some color to our kitchen. When we moved in, we liked how it looked, but knew over time that we wanted to change things up a bit. We're still trying to determine what color to paint our walls, but I wanted to add a nice punch of color to go with our new Fiesta Ware. I found a picture of this great kitchen cart through Pinterest (yes, I know, I have a Pinterest problem) which added a nice splash of color and knew that I wanted to do this as well. 

 I already had the cart, which I bought from IKEA and have had for years, so I just needed to determine a paint color. Actually, that part was easy. I am in love with the combination of red and aqua, and since we received the Martha Stewart blue KitchenAid mixer for our wedding, I really wanted to paint the cart red to house our mixer. I made a quick trip to Home Depot and purchased Rustoleum's apple red latex paint, and also bought a small can of high gloss polyurethane and got to work. I made sure to wash the cart well with soap and water and applied 2 coats or paint and one coat of poly to get the results I wanted, but I LOVE how it turned out. 

 before
 after!


Friday, August 26, 2011

Look What I Made!

Okay, so I decided to take the plunge and break out the sewing machine, knowing that there was a very good chance that I would get frustrated and walk away from it again. And yes, I did let my frustration get the best of me for a few minutes here and there, but I powered through. I did have one incident when my automatic threaded seemed to be broken, and I whined to my husband until he came to my rescue and showed me that my needle wasn't lowered enough for this feature to work. Yay for super hero husbands!

I bought the Butterick See & Sew apron pattern from Hobby Lobby when they were on sale for $1 months ago, and my mother-in-law showed me how to cut out my fabric (calico cotton, also from Hobby Lobby) and the poor things have been sitting, getting permanent fold lines embedded in them for months. I took out my trusty iron nd got to work getting te fabric back into some working order.


There were only 5 seperate pieces that needed to be sewn together, but both the top and bottom parts of the apron called for pleats, and since I'm clueless, I relied on YouTube to show me how to pin them before sewing.

I then pinned for my hem, and I'm probably not even using the hem tool correctly (what is that even called??), but it works for me.


Then I pieced everything together. I used red thread, because I liked the pop of color against the purple fabric.

And voila! We have one finished apron!


It is far from perfect, but I know that with more practice I'll be able to create better projects in time. I still plan on taking the sewing class, which will be taking place in a few weeks, and in the meantime, I'll be checking out tutorials via YouTube, which was definitely a life saver for this project.


Monday, August 22, 2011

Let's Talk About Sewing, Shall We?

For Christmas last year, my mother-in-law bought me this fancy-pants sewing machine:

While I was so excited to receive such an amazing present, I have used a sewing machine all of once in my life, and that was while helping her with a project, and getting frustrated the entire time. I have always wanted to learn how to sew, but never took the initiative to learn. The gift of this machine is the kick in the pants that I needed to become a sewing champ.

I initially decided that a good starter project would be an apron. I went out an bought a simple pattern, and mother-in-law and I went and bought fabric and a couple basic supplies to get me started. She helped me cut out the fabric so that when I got home with it, I could just sew everything together. I was excited to get home to start sewing......until I realized that I dont' know how to make pleats and the sewing terms used in the directions made absolutely no sense to me. I decided I would come back to this when I had more time......that was 4 6 months ago. Maybe a sewing class would be for me!
I did actually look into the sewing class and was amped and ready to go. I found a community class that was super inexpensive ($5), and then it got canceled because the instructor quit and they didn't have a back-up. Boooooo! I didn't want to spend the money for classes through the fabric stores, and I haven't been able to find any other classes that really fit what I wanted, so I've been putting this aside until this week when our community newsletter arrived! The classes are back on! The wonderful, cheap classes! They only offer one class, where you get to learn to sew pajamas, but they will offer it several times over the next few months. My plan is to take one in September, and if I don't really know what's going on, to re-take it in October/November. I'm really hoping that I will learn enough of the basic skills to allow me to use my machine so I can sew many other things.

Cross your fingers for me!

Saturday, August 20, 2011

Saving Up for a Silhouette

I almost jumped on the Cricut bandwagon last year. I bought the Personal Cutter for a steal around Black Friday without doing any research amd when I got home, I pretty quickly realized that I had made an impulse purchase and regretted it. I didn't want to have to purchase a new cartridge (which can get very expensive) for every project I wanted to make, so I sold it on eBay, for a smidge bit more than what I paid for it. I then began to actually research what machine to buy and decided that the Silhouette SD was for me. The only problem was trying to justify the price tag.  I am typically a pretty frugal person and splurge on occasion, but just ask my husband, its hard for me to spend money on myself.

In order to pay for this new toy, I realized that I could buy one by re-selling leftover items from our wedding that have been sitting in our spare bedroom since March. I really just hoped that these things would sprout wings and take care of themselves, but, silly me, these are inanimate objects and therefore needed me to arrange new homes for them. I got out my camera and started snapping pictures and determining a fair price for them. I posted them on theknot and soon other knotties were taking interest. In just over a week I have sold almost enough to make my purchase (woohoo!) Just another couple of purchases will put me over the top and I can place my order and start new, exciting (to me) craft projects!! I really never thought I would get this excited over the thought of crafting, but I am super stoked at way lies ahead for me.

Thursday, August 18, 2011

Pinterest Addiction, and a Pretty Wreath

I'm sure I'm not the only one out there who has been sucked into Pinterest. I have found a whole heap of ideas and recipes thanks to this site and have spent hours looking at pins, re-pinning, organizing, and re-organizing my boards. Thanks to Pinterest, I have added a few tasty recipes to my rotation and have successfully executed a few new craft projects (yay!)

One of these craft projects was a wreath for our front door. I might add that I'm not really a wreath person. I don't know what it is about them that really bugs me, but I irrationally dislike them. I broke down and bought a cranberry wreath from Michael's on Black Friday and it hung on our front door from November until around April. I'm surprised that the wreath police didn't knock down my door since said wreath was definitely not "in season" at that point.

I decided to create a wreath out of leftover paper flowers from our wedding. It looked nice, but since the flowers were made of paper, they didn't hold up so well to the rain and the humidity of summer in Cincinnati, but again, it hung on our door for quite a bit longer than it should have.

While perusing Pinterest, I found this lovely wreath on Teach. Craft. Love.:


I loved the look of it and decided that this may have just converted me into a lover of wreaths.....well, maybe not a lover of all wreaths, but at least a selective lover of wreaths. I made a trip to Hobby Lobby during one of their 50% off floral sales and bought everything I would need to make this baby. Here is how mine turned out:

Not too shabby, eh? Yep my numbers are a little crooked, but so what?? That just adds to the charm of it being homemade, right? I'm glad you agree with me.  Luckily, I already had the tools on hand to assemble this (hot glue gun, wire cutters, floral wire) and it only took about 20 minutes total. All in all, it was an easy, inexpensive project and I wouldn't mind making more in the future.
If you would like to follow my boards on Pinterest, just click on the pretty icon......you know you want to.


Follow Me on Pinterest

Wednesday, August 10, 2011

Howdy!

My name is Lizzie, and I am a 30 year old newlywed who only discovered I was crafty while planning my wedding. I loved creating something out of nothing and seeing my grand vision come to life. I had a taste and I want more.

I have always had a love of creating things. While growing up, my prized possessions included my Easy Bake Oven, Lite Brite, and 64 Box of crayons with the built-in sharpener. One of my favorite "games" was 'Restaurant' where my sister and I would design a physical menu, make my mom order off of it, then I would prepare the meal and serve it to mom.

I'm going to chronicle my adventures in the world of crafting and dabble a bit in the kitchen, while I'm at it.

Welcome to my world!