A few more of these giveaways have popped into my google reader and here they are, for you, my readers:
Little Miss Momma
Kara's Party Ideas
Brown Paper Packages
eighteen25
So- go to these sites, enter, and win!
Thursday, December 29, 2011
Merry Christmas to Me!
I failed to mention the Christmas present that my hubs and I bought for me......a new computer!! The computer I am currently working on is a dinosaur and will run fine for a time and then slows down majorly. My hbs has been reinstalling windows to "fix" this, but I decided it would probably be best in the long run to invest in a new one. We did some researching and decided an all-in-one would fit my needs (also, it is touch screen, which is super fun to play with.) We bought this Dell and it should be here by January 4th according to the shipping confirmation I just got. I can't wait to get my hands on it!

Slhouette Cameo Giveaways!
I've been a bad blogger and have slacked off during this holiday season. I've worked on some projects, but in my rush, failed to take pictures before I gave them as gifts. To make up for this, I am sharing links to Silhouette Cameo Giveaways from the blogs I subsribe to. I LOVE my machine and would love one of you to win one. Here are the giveaways in no particular order:
Skip to My Lou
My Repurposed Life
Craftaholics Anonymous
Crap I've Made
Tater Tots & Jello
I Heart Naptime
All Things Thrifty
House of Hepworths
The Idea Room
Good Luck to you, and if you win, please let me know so I can share in your joy!
Skip to My Lou
My Repurposed Life
Craftaholics Anonymous
Crap I've Made
Tater Tots & Jello
I Heart Naptime
All Things Thrifty
House of Hepworths
The Idea Room
Good Luck to you, and if you win, please let me know so I can share in your joy!
Thursday, December 15, 2011
Glass Etching
I decided to be nice and add an extra gift to go along with the peppermint bark I made for my co-workers, so they are all getting jars to hold the bark! And not just any jars, PERSONALIZED jars! Man, I must really like them.
I have yet to attempt glass etching, but thought this would be a great project to try out this technique. Here are the tools you will need:
- stencil of some kind (I used a vinyl stencil I made on my Silhouette)
- bottle of Armour Etch
- foam brush
- rubber gloves
- glass container of your choice
I went to my closest Hobby Lobby during one of their 50% off glass sales (which, if you didn't know, run pretty much every other week) and purchased 5 smallish glass jars with lids (priced at $3.79 each normally, with the sale were only $1.90 each). Also, I had a 40% off coupon which I used to purchase the Armour Etch. I got a small bottle which cost $8.99 normally, so with the coupon was $5.40. The gloves, foam brush, and vinyl for the stencil are things that I already had lying around the house.
To get started, I created my stencils on my Silhouette, and stuck them to the jars. Sticking vinyl to round objects is not the easiest thing to do, which is why I cut my stencil into 3 seperate pieces. This allowed me to lign up the words better. I would highly recommend doing this.

Then, with the foam brush, I dabbed on a thick coat of the Armour Etch cream, and waited 5 whole minutes (as per the printed instructions on the bottle), then rinsed them off thoroughly under running water.

Here is one of the finished jars:

This is a fairly easy project to take on and there are SO many options for what you can make. I have a couple more gift ideas in the works, and hope the recipients love them!
Tuesday, December 13, 2011
Silhouette Cameo Sale!!
I got really giddy when I opened up the latest e-mail I received from OhMyCrafts. They are running a 25% off your entire order over $50 sale right now. That means, you can be the proud owner of a Cameo for just $202.49, plus, they offer free shipping on any order over $75 (double score!!). Just enter coupon code JINGLE25 at checkout. The Cameo retails at $300, so this is a FANTASTIC deal (and the cheapest I've seen it!) The coupon is good through Christmas Eve, but if you were thinking about getting a Cameo, this would make a great gift to yourself this year!

Sunday, December 11, 2011
Peppermint Bark!
This year as a Christmas gift to my co-workers, I decided to make peppermint bark. I saw the cutest take on it over at Baked by Rachel:
 How genius to make peppermint bark in silicone molds! I've never made bark before, but it looked easy enough, so I decided to attempt it. Its chocolate....how bad could it turn out anyway, right? I ended up going with silicone molds I found on sale at JoAnn's since that is what I could find, and they were so adorable! I bought 2 since I new I would be making several batches and it would save on time.
 I followed this recipe from Rachel's blog (step-by step instructions can be found at the link to her blog above...I omitted the vegetable oil and had great results)
Ingredients:
10oz bag milk or dark chocolate chips
10oz white chocolate chips
1/2 tsp peppermint extract, divided
crushed candy canes or peppermint candies.
Directions:
In a small to medium sized bowl add milk or dark chocolate. Melt in the microwave in 30 second intervals at 50% power. Stir well after each 30 seconds. When fully melted, add 1/4 tsp peppermint extract. Stir well.
Using a small cookie scoop or spoon, divide chocolate among mold cavities. Sprinkle with crushed candies. Chill for at least 30 minutes or until chocolate has set.
Repeat process with white chocolate. Remove from molds after fully hardened. Store in the fridge.
Here is how they turned out:
 So cute! To me, peppermint speaks of this time of year, and this is one of my favorite treats. Hopefully, my co-workers enjoy it as much as I do, and if not, I still enjoyed making it for them anyways.

Ingredients:
10oz bag milk or dark chocolate chips
10oz white chocolate chips
1/2 tsp peppermint extract, divided
crushed candy canes or peppermint candies.
Directions:
In a small to medium sized bowl add milk or dark chocolate. Melt in the microwave in 30 second intervals at 50% power. Stir well after each 30 seconds. When fully melted, add 1/4 tsp peppermint extract. Stir well.
Using a small cookie scoop or spoon, divide chocolate among mold cavities. Sprinkle with crushed candies. Chill for at least 30 minutes or until chocolate has set.
Repeat process with white chocolate. Remove from molds after fully hardened. Store in the fridge.
Here is how they turned out:

Tuesday, December 6, 2011
Zulily
Zulily is a flash sale sight, similar to Rue La La, Ideeli, etc. that is geared towards moms and children. Occasionally they have fun housewares as well. I receive their emails, but I have yet to purchase anything but am really tempted to buy this awesome hat as it brings to mind Luna Lovegood, from Harry Potter (yes I am a dork, and I don't care who knows it.)  The hat is only $8.99 and the thing I love about Zulily is that they have 8-10 different stores featured each day and you can shop from each of these and only pay 1 shipping fee (!). If you would like to purchase this hat, you may follow this link: Critter Hats. You will have to sign up to receive their daily e-mails, but they do have some really cool things each day, and I love looking at all the cool things I can get for our future children, or for our friends awesome rugrats!
I've Been Busy, I Swear!
I have been busy whipping up some Christmas presents and haven't wanted to post them here, since the recipient's read my blog, so I apologize for not letting you in on the fun. I will post after the holidays, I promise.
I am a crazy person, and ordered my camera, and then decided to research it. A friend of mine has it and loves it, but the more reviews I read, the more wary I was about it. So many people have had issues and I decided I would rather invest in a camera that won't have to be repaired several times. I ordered the Nikon P300 and it arrived yesterday. I am SO glad I ordered this one as it has received several awards for being a best all around point and shoot camera, and it takes fabulout photos! Again, I've been busy and I will post pics soon.
Thank you all for being patient!
Monday, November 28, 2011
Happy Cyber Monday!
I took the plunge and decided to do some Cyber Monday shopping for once. I've wanted a new digital camera for some time since its quite obvious that the one we have takes far from stellar photos. I knew that I wanted a camera that did well in lower light situations and has a good macro feature and after researching all weekend, I decided a Nikon would be a good fit for me. I found a great deal on a P700 from Best Buy and my new toy will be arriving in 5-7 business days! It has similar functionality as a DSLR without all the bulk. One day we may be urgrading to a DSLR, but for now I think I'll be happy with this point and shoot. Isn't she pretty?


Friday, November 25, 2011
My Top Secret Beer Bread Stuffing
About 6 Thanksgiving's ago I decided to experiment with stuffing. I had only made Stove Top before this, so I did some research and realized that it really would not be that difficult to make. I came up with this recipe after comparing several different recipes, one of which came from Gourmet magazine, and adapted it to my own liking. Here is my take on stuffing. Yes there are several steps involved, but it is so worth it.
3 cups self rising flour
1/2 cup sugar
12oz beer (really anything you have will work, but I prefer a red or brown ale for its flavor)
Directions:
Preheat oven to 375 degrees. In a large bowl, mix the flour and sugar until combined. Stir in the beer, and mix until all the flour has been absorbed. Your batter will be very sticky. Transfer this to a well greased loaf pan and bake for 55-60 minutes or until bread is golden brown, and there is a nice hard crust on top.


1 loaf beer bread
2 cups onion, chopped
1 1/2 cups celery, chopped
2 golden delicious apples, peeled and chopped
1 stick of butter
1 tsp rubbed sage
1 tsp dried thyme
1 tsp salt + more to taste
1/2 tsp pepper + more to taste
dash of nutmeg
2 cups chicken broth
Preheat oven to 400 degrees. Cut the bread into small cubes, toast for 8-10 minutes on a baking sheet in oven until golden brown. Transfer bread cubes to a large mixing bowl add sage, thyme, 1 tsp salt, and 1/2 tsp pepper. Adjust oven temperature to 325 degree. In the meantime, saute the onion and celery in a large pan in 6 tbsp of butter over med-high heat for about 6 minutes, or until soft. Season with salt and pepper. In a separate pan, saute the apples in 2 tbsp butter. Season with a dash of nutmeg and cook over med-high heath until soft, about 5 minutes.
Transfer the apples, celery and onion to the bowl with the breadcrumbs, add chicken broth and stir until well combined. Transfer to a 9x13 baking pan and bake for 25-30 or until golden brown on top.


Beer Bread Stuffing
Beer Bread
Ingredients: 3 cups self rising flour
1/2 cup sugar
12oz beer (really anything you have will work, but I prefer a red or brown ale for its flavor)
Directions:
Preheat oven to 375 degrees. In a large bowl, mix the flour and sugar until combined. Stir in the beer, and mix until all the flour has been absorbed. Your batter will be very sticky. Transfer this to a well greased loaf pan and bake for 55-60 minutes or until bread is golden brown, and there is a nice hard crust on top.

Sticky, sticky batter

Before baking

Perfectly baked bread!
For the Stuffing
Ingredients:1 loaf beer bread
2 cups onion, chopped
1 1/2 cups celery, chopped
2 golden delicious apples, peeled and chopped
1 stick of butter
1 tsp rubbed sage
1 tsp dried thyme
1 tsp salt + more to taste
1/2 tsp pepper + more to taste
dash of nutmeg
2 cups chicken broth
Preheat oven to 400 degrees. Cut the bread into small cubes, toast for 8-10 minutes on a baking sheet in oven until golden brown. Transfer bread cubes to a large mixing bowl add sage, thyme, 1 tsp salt, and 1/2 tsp pepper. Adjust oven temperature to 325 degree. In the meantime, saute the onion and celery in a large pan in 6 tbsp of butter over med-high heat for about 6 minutes, or until soft. Season with salt and pepper. In a separate pan, saute the apples in 2 tbsp butter. Season with a dash of nutmeg and cook over med-high heath until soft, about 5 minutes.
Transfer the apples, celery and onion to the bowl with the breadcrumbs, add chicken broth and stir until well combined. Transfer to a 9x13 baking pan and bake for 25-30 or until golden brown on top.

All the ingredients

Toasted breadcrumbs

Chopped veg

Veg sauteing

Chopped apple

Apple sauteing with nutmeg

Combine ingredients

And bake!
Friday, November 18, 2011
Vinyl!! Plus links to Cameo Giveaways....I know you want one.
I have been playing around with my new Cameo and decided it was time to start vinyl-ing things. I knew that once I started, it would soon become an addiction, and I keep finding more things in my home that would benefit from the addition of vinyl. I also know that my newfound love of vinyl will more than likely transfer on to some upcoming Christmas presents, so I won't be posting those until after the holidays so as not to ruin the surprise for the recipient if they so happen to be reading this.
My first attempt at using vinyl came in the form of dressing up my Cameo. I am so in love with this. I got the peacock image from the Silhouette store (image peacock_C01202_23067 9/07/2011) I sized it to fit nicely on my machine and cut it out onto lovely purple vinyl. I was SO impressed with out intricate the cuts were on this. Yes it was a PITA to remove all the little bits, but I used my handy dandy hook tool and it made it a lot more easy than me trying to pick them out wth my fingernails.


My first attempt at using vinyl came in the form of dressing up my Cameo. I am so in love with this. I got the peacock image from the Silhouette store (image peacock_C01202_23067 9/07/2011) I sized it to fit nicely on my machine and cut it out onto lovely purple vinyl. I was SO impressed with out intricate the cuts were on this. Yes it was a PITA to remove all the little bits, but I used my handy dandy hook tool and it made it a lot more easy than me trying to pick them out wth my fingernails.

For my second vinyl project, I decided that we needed to clearly mark our recycle bin in our kitchen. We were having people over for my husband's birthday and I knew I'd the question of "Hey, do you recycle" over and over. I did a quick google image search for a recycle symbol and used the Silhouette design software's trace functionality to cut this out onto black vinyl. I wasn't too happy with the way it came out, and you really can't tell unless you look very closely but the cut lines were not super clean on this one. I blame the image I used though, as it wasn't very crisp to begin with. All in all, it serves its purpose and I like how it turned out.


And now for the giveaway links. Just to let you know, I receive nothing by promoting these giveaways, in fact I'm sure these bloggers do not know I even exist. I follow them, and saw their giveaways and thought that one of my lovely readers may want to take their chance at winning an amazing machine. You can find the giveaways at:
If you happen to win one of these, please let me know so that I can do a happy dance with you! Gooooood Luck!
Monday, November 14, 2011
Fun with Vinyl!
My new Cameo arrived on Halloween and I've been so busy the past couple weeks that I haven't spent a whole lot of time get acquainted with it yet. Sad, I know. I did order some vinyl with my new machine, and had to come up with some projects to experiment with it, so I took my time to watch youtube videos before jumping in.
 I found this adorable onesie over at Ashleyannphotography and knew that I wanted to replicate it for my friends daughter.
I got a great deal on heat transfer vinyl through a flash sale site called Scrapbook Steals. Mostly they just have scrapbook paper bundles, but they had one for Silhouette accessories last week, so I had to get in on that. The bundle I purchased came with glitter black heat and flocked white heat trasfer vinyl. I also purchased some more from Oh My Crafts since are running a 2/$20 on heat transfer.
For the onesie, I used the glitter black vinyl for the glasses, and downloaded the image glasses_1947 7/30/2009 from Silhouette. I resized it to fit on the onesie (5" wide) and set the cameo to cut it out, and followed the application instructions that came with the vinyl. I ended up having to increase the heat so that it was higher than what Silhouette suggested, but other than that, their instructions were spot-on. I bought some puffy paint for the "chain" and voila- here is the finished onesie:


I also picked up a cute fleece hoodie from Target, that I did not notice at the time had ears on the hood, but that just added to the cuteness! I used dark pink heat transfer vinyl for this one, and the paw print is part of the Efon font, which I downloaded from dafont.com. I added her initials to the center of the paw print, making sure to flip the font horizontally, so that they are faced the right way when I apply it to the jacket.


I can't wait to see my friends daughter wear these, and hopefully they like them!
I got a great deal on heat transfer vinyl through a flash sale site called Scrapbook Steals. Mostly they just have scrapbook paper bundles, but they had one for Silhouette accessories last week, so I had to get in on that. The bundle I purchased came with glitter black heat and flocked white heat trasfer vinyl. I also purchased some more from Oh My Crafts since are running a 2/$20 on heat transfer.
For the onesie, I used the glitter black vinyl for the glasses, and downloaded the image glasses_1947 7/30/2009 from Silhouette. I resized it to fit on the onesie (5" wide) and set the cameo to cut it out, and followed the application instructions that came with the vinyl. I ended up having to increase the heat so that it was higher than what Silhouette suggested, but other than that, their instructions were spot-on. I bought some puffy paint for the "chain" and voila- here is the finished onesie:


I also picked up a cute fleece hoodie from Target, that I did not notice at the time had ears on the hood, but that just added to the cuteness! I used dark pink heat transfer vinyl for this one, and the paw print is part of the Efon font, which I downloaded from dafont.com. I added her initials to the center of the paw print, making sure to flip the font horizontally, so that they are faced the right way when I apply it to the jacket.
Before:
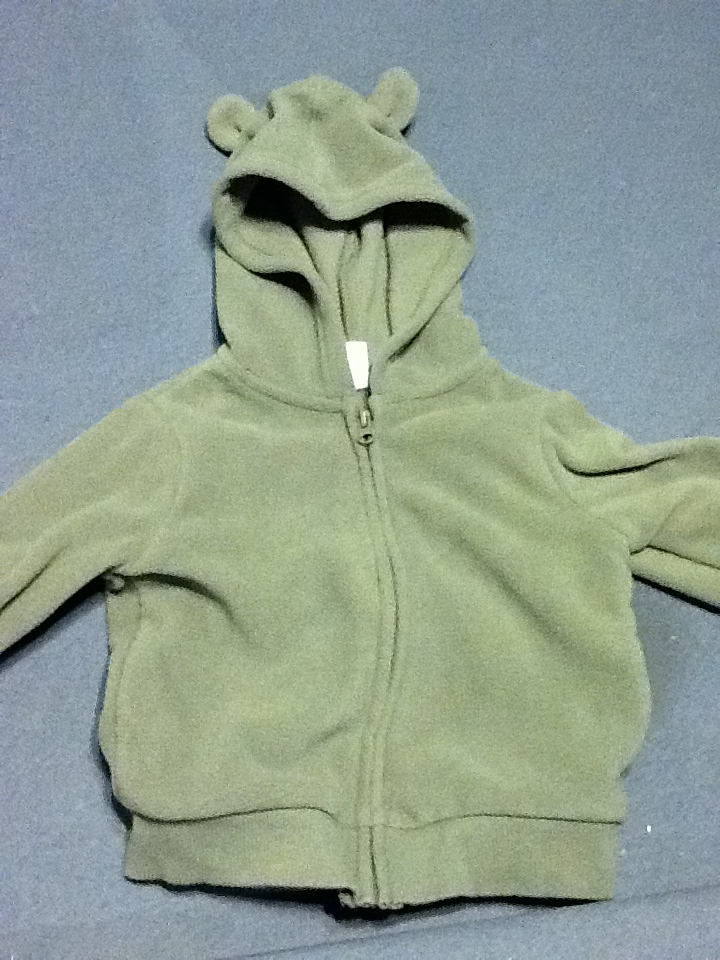
After:


I can't wait to see my friends daughter wear these, and hopefully they like them!
Tuesday, November 1, 2011
Confession
I broke down and ordered a Silhouette Cameo! I know I just bought my sd, but I had no idea how much I was going to love it and realized that I was limited with the size of the sd. I found a great deal on the Cameo through Oh My Crafts and with a coupon code, I ended up paying the same price for it that I paid for my sd. Once I placed my order, I set-up my sd to sell on eBay, and I may end up losing a little on it, its so going to be worth it in the end. Plus, some lucky person is going to get my practically brand new sd for a great price. Its a win-win!
Wednesday, October 26, 2011
Pumpkin Carving
I am artistically challenge, in that I can't draw much more than a stick figure. Seriously. So when it came to carving pumpkins, I aways just opted for an easy toothy grin, because I just couldn't come up with any better ideas that I could draw out and execute. One of my best friends invited me over for pumpkin carving, and I was struggling with an idea, until I realized I could break out my silhouette and make a stencil!
Have I mentioned before just how much I love this machine? It has made craft projects so much more enjoyabe for me, and has greatly improved my crafting skillz. I have not been at a loss for projects since purchasing my silhouette, and I relly have no idea how I got by so long without it.
Okay, sorry about that gushing. Back to pumpkin carving.
I received an e-mail from Silhouette letting me know that all Halloween shapes were on sale for $.75! I browsed the online store until I found a shape that spoke to me. I chose the Owl Jack O Lantern -owl_jack_o_lantern_C20091027181311_19210 10/28/2009 and downloaded it into Silhouette Studio. I knew that I wanted to carve a big pumpkin, so I sized it as large as I could. I ended up going with freezer paper as my material because I knew it would lay the best on a bumpy pumpkin.
Here is what my pumpkin looked like after I got through carving it:
 For the chest feathers, I decided not to carve all the way through, but scraped away the flesh from the pumpkin so that they would have a nice glow when a candle was placed inside.
And now for the pumpkin lit-up:

I realized that once I could see it lit, that my stencil was a wee bit crooked, but I think it turned out amazing!
Have I mentioned before just how much I love this machine? It has made craft projects so much more enjoyabe for me, and has greatly improved my crafting skillz. I have not been at a loss for projects since purchasing my silhouette, and I relly have no idea how I got by so long without it.
Okay, sorry about that gushing. Back to pumpkin carving.
I received an e-mail from Silhouette letting me know that all Halloween shapes were on sale for $.75! I browsed the online store until I found a shape that spoke to me. I chose the Owl Jack O Lantern -owl_jack_o_lantern_C20091027181311_19210 10/28/2009 and downloaded it into Silhouette Studio. I knew that I wanted to carve a big pumpkin, so I sized it as large as I could. I ended up going with freezer paper as my material because I knew it would lay the best on a bumpy pumpkin.
Here is what my pumpkin looked like after I got through carving it:

And now for the pumpkin lit-up:

I realized that once I could see it lit, that my stencil was a wee bit crooked, but I think it turned out amazing!
Monday, October 24, 2011
I Heart Puff Pastry
I love flaky, buttery pasty, but I hate making it from scratch. I was inspired to make a version of a cheese danish when I made a trip to Trader Joe's with my mother in-law and found this delicious sweet and slightly tangy blueberry vanilla goat cheese. I decided that since I was buying this cheese, it would be the perfect time to experiment with puff pastry, since Trader Joe's sells ths as well for a very nice price.
After arriving home with my purchases, I scoured the interwebs for a cheese danish recipe that might suit my needs, and came across several that gave me a better idea of where to go with this. So here is my version:
Blueberry Goat Cheese Danish
Ingredients
8oz log Trader Joe's wild bluberry & vanilla chevre
3tbs. sugar
2 egg yolks
1 tsp water
1/4 tsp. vanilla
2 sheets puff pastry, defrosted
Directions
Pre-heat oven to 375 degrees
In a medium bowl, mix together the chevre and sugar. Add the vanilla and 1 egg yolk, and mix until just combined. Set aside.
Take the puff pastry, 1 sheet at a time and roll out. Place pastry onto a baking sheet lined with parchment paper. Take half of the cheese mixture and spoon out onto the sheet of pastry. Taking a sharp knife, slice the sides of the pastry into 2 inch wide strips and fold the pastry, alternating sides, over the cheese. Repeat this process for the second sheet of pastry and the remaining cheese mixture.
Take the other egg yolk, and whisk with 1 tsp. of water. With a pastry brush, coat the tops of your pastry. Place pastry into the oven and bake for 25-30 minutes or until golden brown. It should look like this:
 This turned out just as I had hoped for, and my husband and I gobbled down one of these danish on Saturday. I decided to gift the other to a friend, but had I not, I'm sure the other would have been devoured on Sunday. Thanks to this experiment, I no longer fear puff pastry, and my mind is full of ideas for future recipes.
After arriving home with my purchases, I scoured the interwebs for a cheese danish recipe that might suit my needs, and came across several that gave me a better idea of where to go with this. So here is my version:
Blueberry Goat Cheese Danish
Ingredients
8oz log Trader Joe's wild bluberry & vanilla chevre
3tbs. sugar
2 egg yolks
1 tsp water
1/4 tsp. vanilla
2 sheets puff pastry, defrosted
Directions
Pre-heat oven to 375 degrees
In a medium bowl, mix together the chevre and sugar. Add the vanilla and 1 egg yolk, and mix until just combined. Set aside.
Take the puff pastry, 1 sheet at a time and roll out. Place pastry onto a baking sheet lined with parchment paper. Take half of the cheese mixture and spoon out onto the sheet of pastry. Taking a sharp knife, slice the sides of the pastry into 2 inch wide strips and fold the pastry, alternating sides, over the cheese. Repeat this process for the second sheet of pastry and the remaining cheese mixture.
Take the other egg yolk, and whisk with 1 tsp. of water. With a pastry brush, coat the tops of your pastry. Place pastry into the oven and bake for 25-30 minutes or until golden brown. It should look like this:

Wednesday, October 19, 2011
A Harry Potter Onesie!
I have been a bad, bad blogger and haven't been around much. We have had a lot going on in our lives lately and I've been traveling a lot for work and we had to work in a vacation in there so my crafting time lately has been limited.
I was thankfully able to work in some craft time over the weekend, and made an adorable Harry Potter related onesie for a friend of mine who will be an aunt very soon. I decided to make a Gryffindor House-ish shirt and came up with this using my Silhouette SD and freezer paper. Man, so I LOVE freezer paper stencils!
 I apologize for the poor photo. I couldn't find my camera and only had my phone handy.
To make this onesie, I downloaded a couple images from the Silhouette Store. For the tie, I used this neck_ties_C00066_22902 and for the crest I used one from this shield_set_C00982_20387. The Gryffindor "G" is just Helvetica font.
I decided to fancy this up a bit by using Tulip Pearl Scarlet Red fabric paint, which has a little bit of shimmer to it, which I think added a nice pop to this lovely onesie. I had to add a tiny drop of black to get it to the proper Gryffindor shade. For the gold, I used Tulip Sunshine Yellow fabric paint.
I really like how this one turned out and I see myself making Hufflepuff, Ravenclaw, and even Slytherin shirts in my future.
I was thankfully able to work in some craft time over the weekend, and made an adorable Harry Potter related onesie for a friend of mine who will be an aunt very soon. I decided to make a Gryffindor House-ish shirt and came up with this using my Silhouette SD and freezer paper. Man, so I LOVE freezer paper stencils!

To make this onesie, I downloaded a couple images from the Silhouette Store. For the tie, I used this neck_ties_C00066_22902 and for the crest I used one from this shield_set_C00982_20387. The Gryffindor "G" is just Helvetica font.
I decided to fancy this up a bit by using Tulip Pearl Scarlet Red fabric paint, which has a little bit of shimmer to it, which I think added a nice pop to this lovely onesie. I had to add a tiny drop of black to get it to the proper Gryffindor shade. For the gold, I used Tulip Sunshine Yellow fabric paint.
I really like how this one turned out and I see myself making Hufflepuff, Ravenclaw, and even Slytherin shirts in my future.
Tuesday, September 20, 2011
Homemade Ice Cream!
I apologize for not posting this week. I had to go to Arizona for work and couldn't do anything crafty. Its SO good to be home!
We got an ice cream maker attachment to go with our Kitchanaid mixer and had yet to use it. My best friend and her husband were coming over for dinner and a game night, so I decided that this would be the best time to whip it out and make something delicious.
We love coconut and we knew our guests love coconut, so I scoured the web for an easy recipe to try out and found this one on allrecipes.com, which made about a quart of ice cream.


With this recipe it is super important to use cream of coconut, not coconut milk. Cream of coconut is similar to sweetened condensed milk, where coconul milk is similar to evaporated milk. You really need the sweetness from the cream of coconut to have a delicious, sweet ice cream.
I also added a bar of dark chocolate, which I chopped up and added to the ice cream about 15 minutes into the churning process. I made this the night before so that it would have time to set-up, but it was still a little on the soupy side toward the bottom of the container, but I realized our freezer wasn't turned down very much. Hopefully I'll have better luck the next time around, but it was still very yummy.
We got an ice cream maker attachment to go with our Kitchanaid mixer and had yet to use it. My best friend and her husband were coming over for dinner and a game night, so I decided that this would be the best time to whip it out and make something delicious.
We love coconut and we knew our guests love coconut, so I scoured the web for an easy recipe to try out and found this one on allrecipes.com, which made about a quart of ice cream.

Ingredients
- 1 cup milk
- 1 (14 ounce) can cream of coconut
- 1 1/2 cups heavy cream
- 1 1/2 cups sweetened flaked coconut (optional)
Directions
- Combine the milk and cream of coconut in the container of a food processor or blender, and mix thoroughly. Stir in cream and flaked coconut.
- Pour into the container of an ice cream maker, and freeze according to the manufacturer's instructions

With this recipe it is super important to use cream of coconut, not coconut milk. Cream of coconut is similar to sweetened condensed milk, where coconul milk is similar to evaporated milk. You really need the sweetness from the cream of coconut to have a delicious, sweet ice cream.
I also added a bar of dark chocolate, which I chopped up and added to the ice cream about 15 minutes into the churning process. I made this the night before so that it would have time to set-up, but it was still a little on the soupy side toward the bottom of the container, but I realized our freezer wasn't turned down very much. Hopefully I'll have better luck the next time around, but it was still very yummy.
Thursday, September 8, 2011
Sewing Class Fail
I attempted to sign up for the sewing classes that I had mentioned before, and found that the class was full. I was sure that there were multiple sessions of this class and even checked my flyer again to verify this. Sure enough, there were 6 sessions listed.
I checked the website multiple times over the next few days to see if they might be adding more classes to their roster, but still nothing. I had attempted to call them, but kept getting a recording, so I sent an email. It took them 3 days to get back to me just to inform me that the class is a 6 week session and that I had read the flyer wrong.there were already 5 people on the wait list, so chances of me getting in were slim to none. They assured me that if I was on the wait list, that I would be the first to get to register for classes in the Spring. WTH?!? I have to wait until SPRING??
Now, this is not at all what I had expected, and I had inquired about the class last Spring and was told I would be informed of when this sessions class would begin since the past session had been canceled. I guess thats what I get for trying to save money on sewing classes. I need to suck it up and spend some money on other, more expensive classes.
Now I just need to find one.
Monday, September 5, 2011
My First Freezer Paper Stencil Tutorial
I was finally able to sit down with my Silhouette and start to figure it out. I decided that an easy starter project would be a t-shirt made with a freezer paper stencil. I saw this great onsie on Pinterest and knew I would want to make this for friends who love all things Potter.


The instructions on the paint suggested that you heat-set the paint, so I took a dish towel that I folded in half, and placed that on top of the shirt and ironed it using high heat for about 30 seconds.

To get started, I downloaded a Harry Potter font on dafont.com, which is one of my favorite sites for free fonts.
I then measured my shirt to determine how big I should make my stencil.

I opened up Silhouette Studio and created a new project. Since the shirt measured about 10 inches across, I decided the stencil should be 7 inches wide.

I then cut my freezer paper just a bit larger then my stencil using a paper trimmer and placed the paper, shiny side down on the cutting mat. I tried to use the sticky mat and had horrible results when trying to peel the stencil off, so I switched to the less sticky mat.

I used the settings for vellum, and told my Silhouette to cut.

When it finishes, just peel the stencil off the mat. You'll have something that looks like this left on your mat

You will need to peel out the center of the remaining letters and use those to fill in the stencil on your shirt.
Before applying your stencil to your shirt, make sure that you have pre-washed and dried it in case it decides to shrink a bit. You should also iron your shirt before applying your stencil.
To apply your stencil, simply place it on your shirt and iron it in place using medium-high heat, until you are sure it is nice and secure. Then add the centers of your letters and iron in place. Make sure you are not using a steam setting on your iron, as this will mess up your stencil.
You are now ready to paint! I used Tulip permanent fabric paint, which can be found in a wide variety of colors and finishes at any craft store. I got mine during a sale a JoAnn's for around $1 for a small container. I then used a foam brush to evenly apply the paint.


To get the look I wanted, I applied 2 coats of paint and waited a couple hours for each coat to dry completely before applying the next. I also placed a piece of cardboard inside the shirt in case the pain decided to bleed through the fabric.
Once both coats were dry, I simply peeled off the freezer paper to reveal the finished product.


The instructions on the paint suggested that you heat-set the paint, so I took a dish towel that I folded in half, and placed that on top of the shirt and ironed it using high heat for about 30 seconds.

All in all, this was an easy project, and I'm sure I'll be making plenty more of these in the future.
Sunday, September 4, 2011
First Attempt at Scones = Success!
On weekends, we like to stop by a local coffee shop for pastries and coffee and we almost always get scones. I've had a slight desire to make them, but figured they would be too much trouble and I was terrified that they would be dry and inedible. Well, I recently found a recipe for blueberry scones from Cooks Illustrated, and I'm always a fan of their recipes and knew I would be trying this one out.
I did just that this weekend. I got up early and headed out to the store to pick up ingredients and got started. All in all, it was a pretty easy recipe. The most annoying thing about this recipe was having to grate frozen butter, but I know this step was integral in making these scones so delicious. Also, the dough was very sticky, and I didn't add enough flour when I rolled out the dough, so I'll have to be mindful about this for the next time. Because the dough was so sticky, I also had issues with cutting the dough as the instructions stated, so I just made them drop scones. They aren't the prettiest, but who cares!
These came out crispy on the outside and nice, soft, and moist on the inside. The blueberries were plump, tart, and paired wonderfully with the lemon zest. I will definitely be making these again and will seek out more scone recipes to try.

Scones fresh out of the oven

Blueberry Scones
Makes 8 large scones
Adapted from Cooks Illustrated magazine, Jul/Aug 2007 issue
Adapted from Cooks Illustrated magazine, Jul/Aug 2007 issue
- 1 stick plus 2 tbsp. unsalted butter, frozen whole
- 1 ½ c fresh blueberries (about 7 1/2 ounces), picked over2
- ½ c whole milk
- ½ c sour cream
- 2 c unbleached all-purpose flour (10 ounces), plus additional for work surface
- ¾ c sugar (3 1/2 ounces), plus 1 T for sprinkling
- 2 tsp baking powder
- ¼ tsp baking soda
- ½ tsp table salt
- 1 tsp grated lemon zest
- Adjust oven rack to middle position and heat oven to 425°F. Score and remove half of wrapper from each stick of frozen butter. Grate 1 stick of butter from unwrapped ends on large holes of box grater. Place grated butter in freezer until needed. Melt 2 tablespoons of remaining ungrated butter and set aside. Place blueberries in freezer until needed.
- Whisk together milk and sour cream in medium bowl; refrigerate until needed. Whisk flour, 1/2 cup sugar, baking powder, baking soda, salt, and lemon zest in medium bowl. Add frozen butter to flour mixture and toss with fingers until thoroughly coated.
- Add milk mixture to flour mixture; fold with spatula until just combined. With rubber spatula, transfer dough to liberally floured work surface. Dust surface of dough with flour; with floured hands, knead dough 6 to 8 times, until it just holds together in ragged ball, adding flour as needed to prevent sticking.
- Roll dough into approximate 12-inch square. Fold dough into thirds like a business letter, using bench scraper or metal spatula to release dough if it sticks to countertop. Lift short ends of dough and fold into thirds again to form approximate 4-inch square. Transfer dough to plate lightly dusted with flour and chill in freezer 5 minutes.
- Transfer dough to floured work surface and roll into approximate 12-inch square again. Sprinkle blueberries evenly over surface of dough, then press down so they are slightly embedded in dough. Using bench scraper or thin metal spatula, loosen dough from work surface. Roll dough, pressing to form tight log. Lay seam-side down and press log into 12 by 4-inch rectangle. Using sharp, floured knife, cut rectangle crosswise into 4 equal rectangles. Cut each rectangle diagonally to form 2 triangles and transfer to parchment-lined baking sheet.
- Brush tops with melted butter and sprinkle with remaining tablespoon sugar. Bake until tops and bottoms are golden brown, 18 to 25 minutes. Transfer to wire rack and let cool 10 minutes before serving.
- Refrigerate or freeze leftover scones, wrapped in foil, in an airtight container. To serve, remove foil and place scones on a baking sheet in a 375°F oven. Heat until warmed through and recrisped, 8 to 10 minutes if refrigerated, 16 to 20 minutes if frozen.
To make ahead:
After placing the scones on the baking sheet, either refrigerate them overnight or freeze. When ready to bake, for refrigerated scones, heat oven to 425°F and continue with step 6. For frozen scones, heat oven to 375°F, resume with step 6, and extend cooking time to 25 to 30 minutes.Friday, September 2, 2011
Silhouette Update!!
I've been traveling for work this week, so haven't been able to post, or actually I haven't had much to post about as work travel doesn't allow much time for crafting. Anywho, I reached my goal and ordered a Silhouette SD! My machine arrived this past weekend, and as we were busy, I barely had enough time to pull it out of the box and install the software. I have big plans for this long weekend to start seeing what this machine is capable of. While I was out of town, I was able to look through Silhouette's online store and several blogs and Etsy shops to get some ideas,and I am pumped to get started!
I promise I will post my experiences this weekend.
I promise I will post my experiences this weekend.
Sunday, August 28, 2011
A Coat of Paint
We've been working little by little on adding some color to our kitchen. When we moved in, we liked how it looked, but knew over time that we wanted to change things up a bit. We're still trying to determine what color to paint our walls, but I wanted to add a nice punch of color to go with our new Fiesta Ware. I found a picture of this great kitchen cart through Pinterest (yes, I know, I have a Pinterest problem) which added a nice splash of color and knew that I wanted to do this as well.

I already had the cart, which I bought from IKEA and have had for years, so I just needed to determine a paint color. Actually, that part was easy. I am in love with the combination of red and aqua, and since we received the Martha Stewart blue KitchenAid mixer for our wedding, I really wanted to paint the cart red to house our mixer. I made a quick trip to Home Depot and purchased Rustoleum's apple red latex paint, and also bought a small can of high gloss polyurethane and got to work. I made sure to wash the cart well with soap and water and applied 2 coats or paint and one coat of poly to get the results I wanted, but I LOVE how it turned out.

before

after!

Subscribe to:
Posts (Atom)